
Yesterday we talked about swatching and gauge. My gauge over 4" is 5 sts/inch. I want a 36" (in circumference) sweater, so 5 x 36 = 180 sts.


As you can see, I've drawn a schematic on my instruction sheet. Pretty straightforward, it tells me everything I need to know at this point. I know the number of stitches need for the body, 1/2 of those stitches for the front and back, the number of ribbing stitches I need. I don't need to do anything else until I start to get to about 1 1/2 inches from the underarm.

See the word "Rib"? Typically the ribbing is about 90% of the body sts, which would be 162 sts. But I use k2, p2ribbing, which is a multiple of 4, and 4 doesn't divide evenly into 162. So, I decided on 164 sts for the rib. I could have gone down to 160 also. Doesn't really matter with this weight yarn. If I were knitting with chunky yarn, then those 2 sts would make a big difference.
I mark the beginning of each round with a stitch marker, and place on halfway across, thus setting up my front and back.
The body number, 180 stitches, is still tentative. I know that's approximately where I want to be, but I haven't charted out the pattern yet. I chart out 1/2 the pattern. Using my graph paper (and here paper is so much easier than charting programs), I mark out 90 stitches, which will be the front. The back is exactly the same, so I only have to do one chart.


The first picture shows my instruction sheet with schematic and instructions and chart. The second one is a close-up of the pattern. The chart is 90 stitches. I've only done the first 2 patterns fully since they just repeat along the row. I do chart the first few rows all along just so that I keep my count correct.


Notice that I have an extra stitch at the end of the chart. That's my "seam" stitch. I like to run a purl stitch as a fake seam on both the front and back. So, I will knit following the chart, purl that last stitch, slip my seam marker, and then repeat. You can leave it out, but I like having a seam stitch, which I will then work up as my center of the sleeve.
Swatching the patterns. With knit/purl patterns I don't swatch them first. I've been doing this sooooo long that I don't need to do it. I can tell pretty much what the pattern will look like from the chart. I don't even use knitters' graph paper. BUT, you should knit up some swatches, just to see if your gauge is different from your stockinette swatch. And of course you want to see what it actually looks like in your yarn. If I were doing cables or lace or twist stitches or color work however, I would definitely swatch and swatch some more. Cables, twist sts and stranded color work narrow the garment, while lace opens it up. In these cases your stockinette swatch and your pattern swatch will NOT have the same gauge.
OK, so where do I get my patterns from? In the body of this sweater, I'm using authentic fisherman stitches which I've found in 3 books:

You can probably find these at your library or through inter-library loan (ILL). You could try eBay or Etsy or Amazon. I don't know if they are still in print. You knitting guild might have them in its library. A great source for all things knitting is Schoolhouse Press. Or you can design your own knit/purl pattern.
Charting. I start smack in the middle of the chart and then work right and left of it. I like to separate my patterns with either 2 purl stitches or purl, knit, purl. I just kept working them until I found that I was 3 sts away from the end on the right and 4 on the left. I decided that I didn't need to work any pattern over 3 sts, so left them as stockinette. The fourth stitch on the left is my seam stitch. Questions? Does this make any sense?
Sometimes the patterns don't work out nicely with too many stitches at either end. Then I might switch them around and have the middle pattern as something else. You can repeat the same pattern all along the row, separating them with purl2, or even not separating them at all. You play with it. Yes, there can be a lot of erasing, but this is the real creative part of the process, and here is where you play. It is such fun. Since your are knitting up your individual patterns, you can lay them next to each other to see if you like how they look. I don't, but then I've been doing this for a thousand years.
Begin knitting. Cast on your ribbing, work a couple of inches or more as you like, then increase to the body stitches. To make this easy, divide the number of stitches to be increased by two (front and back) and then, more or less evenly. Switch to a round of stockinette, and then increase your stitches. So, I needed to increase a total of 16 sts, 8 for the front and 8 for the back. It helps to think of increasing like this, makes it much more manageable. Then, the fun begins. Start your chart.
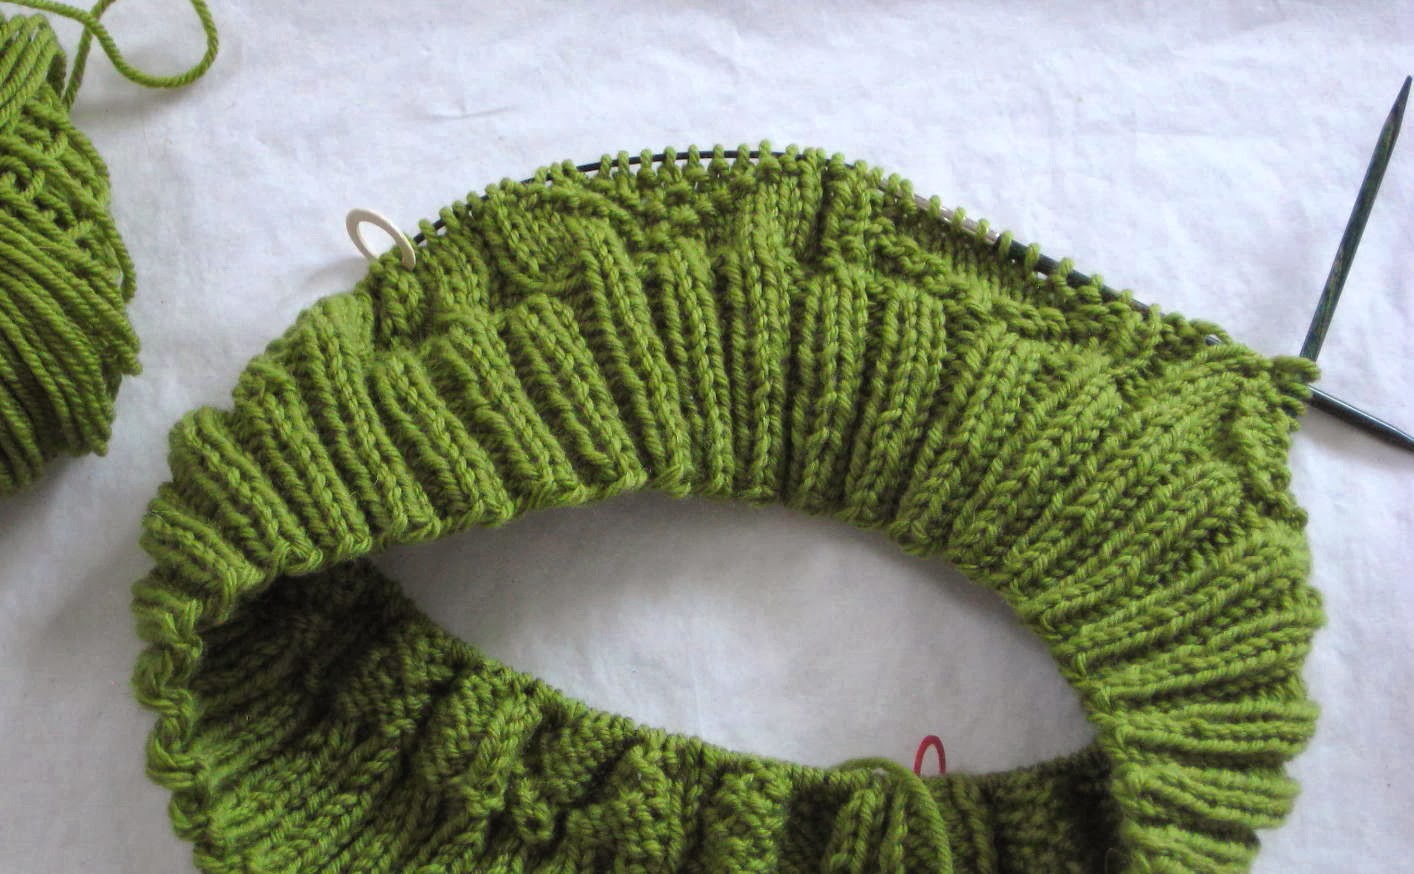


Now I just keep knitting until I am about 1 1/2 inches from the underarm. At that point I'll insert a dividing pattern. For now, I'll happily motor along with Emily's sweater.
Questions? Feel free to ask in the comments. I'll happily work with you on this.
2 comments:
Okay, Going to double check my gauge, but I think I'm good. I'm using some yarn that I already swatched for another sweater, but it's flat, not round, so I'll co on a bit in the round just to be sure. And, could I have your body, please? Requires much fewer stitches and less yarn. :)
My kids and I all wear about a 36" sweater, but theirs are longer in the body.
This is my favorite part of a sweater: the body. Delicious mindless knitting.
Post a Comment